
Submitted ByEdit Dates
Date Uploaded: December 15, 2004, 5:35 am Last Edited: December 14, 2015, 7:51 pm |
 Add to Add toSite Favourites Print this Article |
Creating a Coif
Article © MAIL User: Aderamelech
1) Start by making an expanding circle of European 4 in 1, using whatever method you like. Here I am using five triangles around a larger middle ring. If you do use triangles I think it is better to use five (as opposed to six) since you don't want this to be completely flat. (Unless the top of your head doesn't curve.) For reference this wire is about 12 or 10 guage, 1/2 inch rings, and 1 inch for the large one.

2) Connect up the triangles using whatever angle seam you like to use.

3) Continue adding rings without adding any more expansions. This will continue to pull the edges of the cap down. If you have measured correctly you will be able to continue to add rings until the cap fits snugly around your brow. If it is too tight you can put in a few more expansions.

4) Here is another example of a top, this time made with the expanding rings stagered to make circle. Notice how it does not lay completely flat. As above, you want to have slightly fewer expansions then required to make it flat.

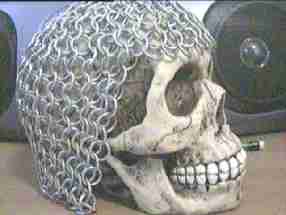
5) As you can see the bunching up of the rings goes away once the piece is on a curved surface.


6) Now add panels on the sides and back, starting as close to the front of you face as you like. As you see here, because the sides are hanging freely, they tend to taper towards the bottom.
7) This can be fixed by adding angled edges.

This then is your basic, open neck coif. To make what is generally called a full coif, you would attach a mantle to the bottom edge.
2) Connect up the triangles using whatever angle seam you like to use.
3) Continue adding rings without adding any more expansions. This will continue to pull the edges of the cap down. If you have measured correctly you will be able to continue to add rings until the cap fits snugly around your brow. If it is too tight you can put in a few more expansions.
4) Here is another example of a top, this time made with the expanding rings stagered to make circle. Notice how it does not lay completely flat. As above, you want to have slightly fewer expansions then required to make it flat.
5) As you can see the bunching up of the rings goes away once the piece is on a curved surface.
6) Now add panels on the sides and back, starting as close to the front of you face as you like. As you see here, because the sides are hanging freely, they tend to taper towards the bottom.
7) This can be fixed by adding angled edges.
This then is your basic, open neck coif. To make what is generally called a full coif, you would attach a mantle to the bottom edge.
Original URL: http://www.mailleartisans.org/articles/articledisplay.php?key=94
