
Submitted ByEdit Dates
Date Uploaded: July 7, 2014, 7:49 pm Last Edited: February 1, 2016, 1:34 am |
 Add to Add toSite Favourites Print this Article |
Joining Dragonscale
Article © MAIL User: Phong
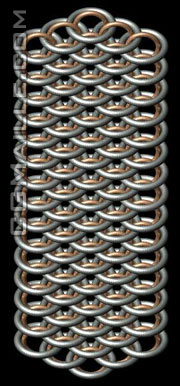
Dragonscale is arguably one of the coolest looking chainmaille weaves. It's so sleek and intricate that you hate to break up the pattern to put in a clasp. If only there were some way to join the two ends of Dragonscale so you could have continuous cool. As it so happens, there is. By filling in from the side, you can avoid having to try to fit your pliers into a ridiculously tiny space to close a ring. I can personally vouch for this method, having used it to repair a ring in the middle of a patch of 24awg 5/64" and 22awg 1/8" Dragonscale. It worked, but 'twasn't easy or quick, so be prepared for the possibility of aggravation. Dragonscale requires two ring sizes. There are two requirements for choosing ring sizes: The first is that the outer diameter of the small ring must be smaller than the inner diameter of the large ring; the second is the inner diameter of the small ring must be at least 3 times the wire thickness of the large ring. This is so everything can fit with wiggle room.
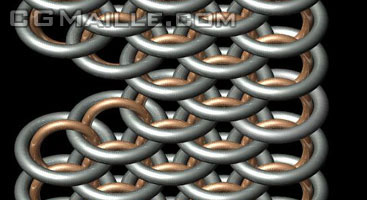
Step 1: Make a patch of Dragonscale that's as long as the finished circumference should be. It should be pointed at both ends, with small rings included at both ends.
Step 2: Bring the ends around so they're facing each other. At this point, make sure that all the small rings are sticking out and where they should be.
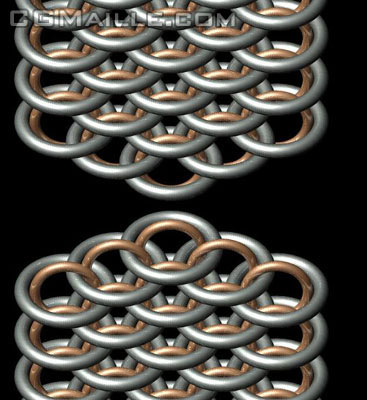
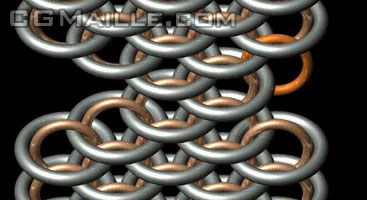
Step 3: Attach a small ring to the two end large rings. It should go between the two end small rings.
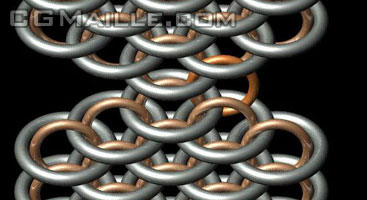
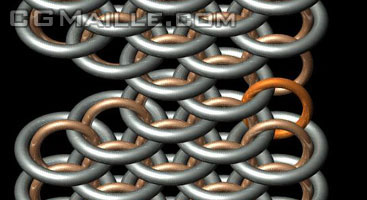
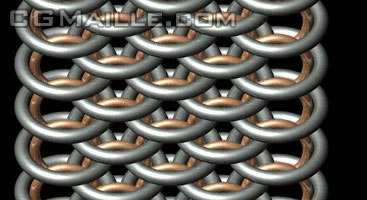
Step 4: Connect a large ring to the two small rings that were the end rings in the original patch. This ring should go around the ring you added in the previous step.
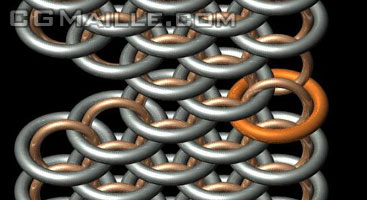
Step 5: Connect a small ring to the large ring you added in the previous step and the large ring just above it. The ring should go between the two small rings next to it.
Step 6: Now connect a small ring to the large ring you added in step 4 and the large ring just below it. The ring should go between the two small rings next to it.
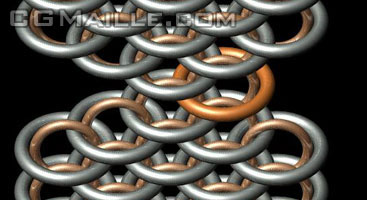
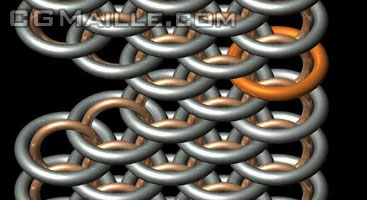
Step 7: Add a large ring to the appropriate small rings. (Any more technical description would be long and drawn out, and probably confuse you more than it's worth)
Step 8: Add a large ring just above the large ring you just added.
Step 9: Continue adding small and large rings until you finish that side.
Step 10: Do the whole shebang again for the other side.
Strictly speaking, you don't need to work from the middle. You can make the points at one side and work your way all the way across; this approach allows you to avoid having a lot of extra rings flapping around in your way.
Step 1: Make a patch of Dragonscale that's as long as the finished circumference should be. It should be pointed at both ends, with small rings included at both ends.
Step 2: Bring the ends around so they're facing each other. At this point, make sure that all the small rings are sticking out and where they should be.
Step 3: Attach a small ring to the two end large rings. It should go between the two end small rings.
Step 4: Connect a large ring to the two small rings that were the end rings in the original patch. This ring should go around the ring you added in the previous step.
Step 5: Connect a small ring to the large ring you added in the previous step and the large ring just above it. The ring should go between the two small rings next to it.
Step 6: Now connect a small ring to the large ring you added in step 4 and the large ring just below it. The ring should go between the two small rings next to it.
Step 7: Add a large ring to the appropriate small rings. (Any more technical description would be long and drawn out, and probably confuse you more than it's worth)
Step 8: Add a large ring just above the large ring you just added.
Step 9: Continue adding small and large rings until you finish that side.
Step 10: Do the whole shebang again for the other side.
Strictly speaking, you don't need to work from the middle. You can make the points at one side and work your way all the way across; this approach allows you to avoid having a lot of extra rings flapping around in your way.
Original URL: http://www.mailleartisans.org/articles/articledisplay.php?key=725
