
Submitted ByEdit Dates
Date Uploaded: October 24, 2009, 12:01 am Last Edited: December 20, 2012, 11:55 am |
 Add to Add toSite Favourites Print this Article |
Sierpinski's Triangle in 4 Easy Steps
Article © MAIL User: ElementalDragon
As far as I know, Sierpinski's Triangle is the first weave that duplicates a mathematical fractal, albeit a fairly simple one, as best that little loops of metal can. If I'm wrong, somebody needs to correct me on this.
Presented here is a 4-step method of constructing Sierpinski's Triangle. It is somewhat advanced in that it makes some assumptions about your, the reader's, knowledge of maille terms and ability to observe details of ring connections. I do plan on writing up a more detailed tutorial with a more detailed breakdown of steps, and when I do, this sentence will be replaced with a link to that other tutorial.
The rings used in these images are 12AWG (.0808", 2.05232mm) salvaged copper electrical wire wound on a 3/16" (4.7625mm) rod and cut with a jeweler's saw using a 6/0 blade. Nominal aspect ratio is AR of 2.321. Using the standards set forth by Blaise in Aspect Ratio Studies and taking the measurements using dial calipers with .001" increments, the rings have a measured AR of 2.278 (MAR).
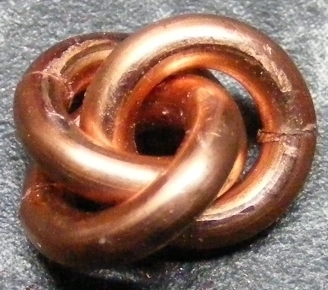
Step 1:
Make a three ring Mobius Ball. While you are at it, make a few, in multiples of 3, then you won't have to come back in a bit and make some more. Make sure they all spiral in the same direction. To follow with all the steps in this tutorial, you will need 27 of these. If you want to keep going, you'll need more than that.
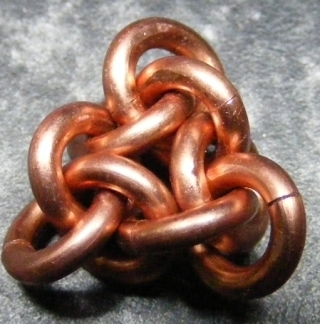
Step 2:
You need at least 3 mobiuses from step 1 to proceed with step 2. If you have them, then proceed. If not, go back and make some more and then come back when you are ready. Connect 3 of your mobiuses from step 1 to each other to form the Triangle unit below. Again, you'll need several of these to continue with the tutorial. 9 of them to be exact. Make a few while you are here.
While a three ring mobius is the building block for this weave, what truly defines this weave is this unit here.
Step 3:
You need at least 3 Triangle units from step 2 to proceed with step 3. If you have them, then proceed. If not, go back and make some more and then come back when you are ready. Connect three of your Triangle units from step 2 to each other to form the triangle assembly below. And yet again, you'll need more than one of these to continue with the tutorial. 3 more, at this point. Go ahead and do a few of these while you are here.

Step 4:
Finally, the end to the repetitive nonsense, right? Well, let's finish this up and see. You need 3 triangle assemblies from step 3 to proceed with step 4. If you have them, then proceed. If not, go back and make some more and then come back when you are ready. Connect three of your triangle assemblies from step 3 into the triangle formation shown below. Congratulations! This is as far as I'm going with this in this document.
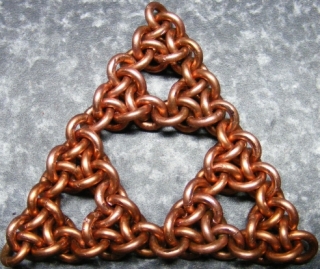
Hopefully by now you are able to see the pattern that emerges. To continue to expand in this fashion, you would repeat steps 1 through 4 twice more and add a fifth step of connect your step 4 units together in a triangle formation. Repeat ad nauseum to duplicate Sierpinski's Triangle to whatever size you wish.
While looking at the Triangle units (step 2), and constructing the assembly in this tutorial, I got to wondering if a denser web could be made by filling in the larger openings in the step 4 formation with another unit. This would make a web or mesh with the only opening being the size of the step 3 openings. At this time (March 11, 2008) I have not attempted that. A larger AR would definitely work, but there are issues with that, in my opinion.
Sierpinski's Triangle is a very happy weave at this low of an AR. The Triangle units hold their form well, and, while a tiny bit difficult to connect sometimes, are not impossible. I have played with a higher AR ring (TRL's 14g 1/4" machine cut copper, listed AR of 3.2) for my other tutorial, ideally for a better view of what is happening with the weave. However, the higher AR allowed a degree of floppiness into the Triangle units that I found made the weave more difficult to keep track of. That may just be my personal preference, so try whatever you think you might like. I will say that you probably can't go a whole lot lower than this AR and still have it be a workable weave.
Those are my comments and observations at the moment. Yeah, this got kind of repetitive, but then again, what weave isn't a matter of repetition? Have fun, y'all.
Presented here is a 4-step method of constructing Sierpinski's Triangle. It is somewhat advanced in that it makes some assumptions about your, the reader's, knowledge of maille terms and ability to observe details of ring connections. I do plan on writing up a more detailed tutorial with a more detailed breakdown of steps, and when I do, this sentence will be replaced with a link to that other tutorial.
The rings used in these images are 12AWG (.0808", 2.05232mm) salvaged copper electrical wire wound on a 3/16" (4.7625mm) rod and cut with a jeweler's saw using a 6/0 blade. Nominal aspect ratio is AR of 2.321. Using the standards set forth by Blaise in Aspect Ratio Studies and taking the measurements using dial calipers with .001" increments, the rings have a measured AR of 2.278 (MAR).
Step 1:
Make a three ring Mobius Ball. While you are at it, make a few, in multiples of 3, then you won't have to come back in a bit and make some more. Make sure they all spiral in the same direction. To follow with all the steps in this tutorial, you will need 27 of these. If you want to keep going, you'll need more than that.
Step 2:
You need at least 3 mobiuses from step 1 to proceed with step 2. If you have them, then proceed. If not, go back and make some more and then come back when you are ready. Connect 3 of your mobiuses from step 1 to each other to form the Triangle unit below. Again, you'll need several of these to continue with the tutorial. 9 of them to be exact. Make a few while you are here.
While a three ring mobius is the building block for this weave, what truly defines this weave is this unit here.
Step 3:
You need at least 3 Triangle units from step 2 to proceed with step 3. If you have them, then proceed. If not, go back and make some more and then come back when you are ready. Connect three of your Triangle units from step 2 to each other to form the triangle assembly below. And yet again, you'll need more than one of these to continue with the tutorial. 3 more, at this point. Go ahead and do a few of these while you are here.
Step 4:
Finally, the end to the repetitive nonsense, right? Well, let's finish this up and see. You need 3 triangle assemblies from step 3 to proceed with step 4. If you have them, then proceed. If not, go back and make some more and then come back when you are ready. Connect three of your triangle assemblies from step 3 into the triangle formation shown below. Congratulations! This is as far as I'm going with this in this document.
Hopefully by now you are able to see the pattern that emerges. To continue to expand in this fashion, you would repeat steps 1 through 4 twice more and add a fifth step of connect your step 4 units together in a triangle formation. Repeat ad nauseum to duplicate Sierpinski's Triangle to whatever size you wish.
While looking at the Triangle units (step 2), and constructing the assembly in this tutorial, I got to wondering if a denser web could be made by filling in the larger openings in the step 4 formation with another unit. This would make a web or mesh with the only opening being the size of the step 3 openings. At this time (March 11, 2008) I have not attempted that. A larger AR would definitely work, but there are issues with that, in my opinion.
Sierpinski's Triangle is a very happy weave at this low of an AR. The Triangle units hold their form well, and, while a tiny bit difficult to connect sometimes, are not impossible. I have played with a higher AR ring (TRL's 14g 1/4" machine cut copper, listed AR of 3.2) for my other tutorial, ideally for a better view of what is happening with the weave. However, the higher AR allowed a degree of floppiness into the Triangle units that I found made the weave more difficult to keep track of. That may just be my personal preference, so try whatever you think you might like. I will say that you probably can't go a whole lot lower than this AR and still have it be a workable weave.
Those are my comments and observations at the moment. Yeah, this got kind of repetitive, but then again, what weave isn't a matter of repetition? Have fun, y'all.
Original URL: http://www.mailleartisans.org/articles/articledisplay.php?key=460
